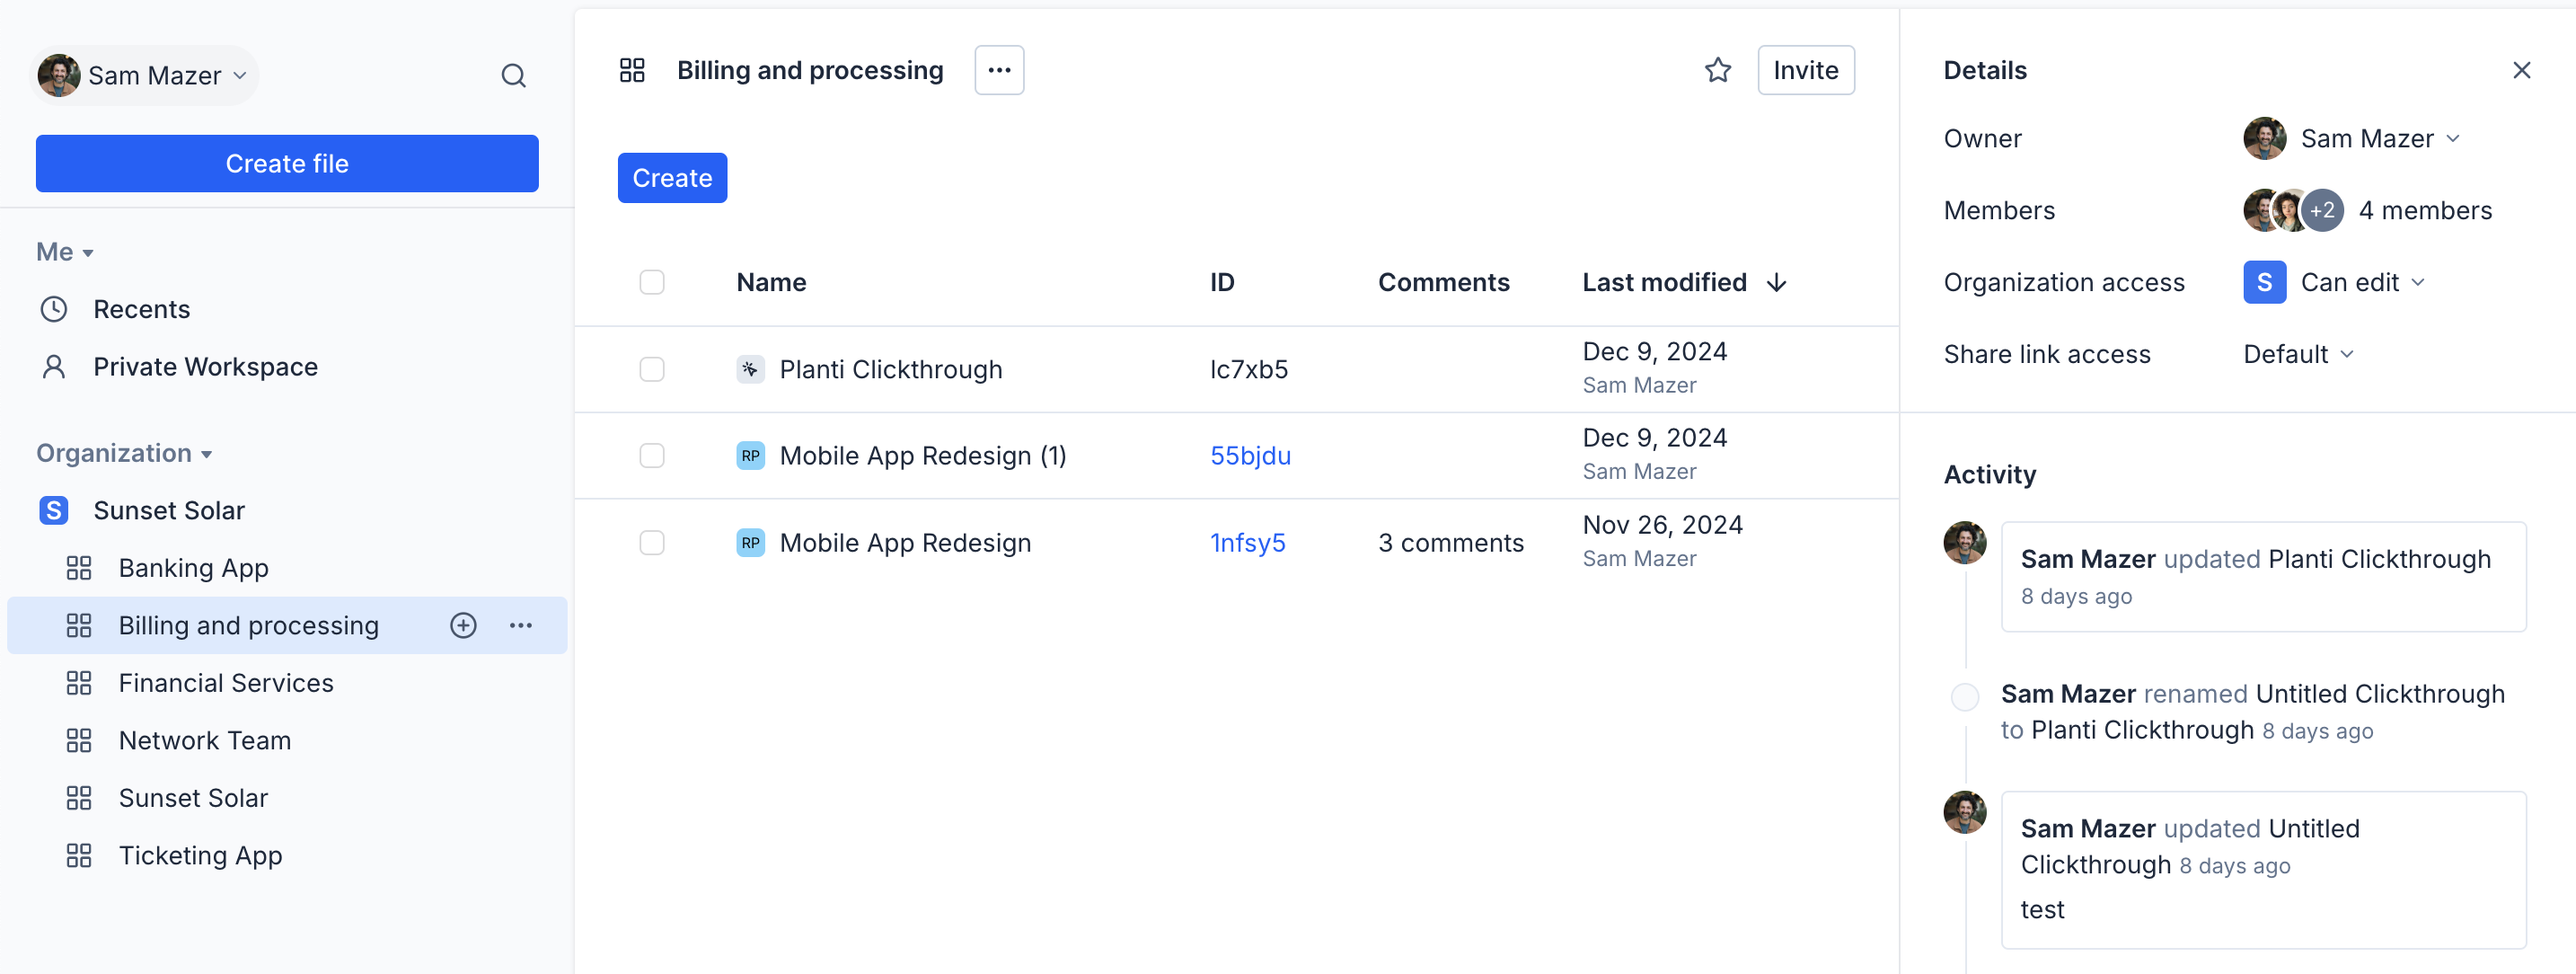
Axure Cloud workspaces
Workspaces in Axure Cloud are what contain your Axure RP published prototypes and Axure Cloud clickthrough projects. Workspaces are like folders, and you can organize them further by adding any number of subfolders. Each workspace belongs to an organization, except for your private workspace.
Managing workspaces
Creating workspaces
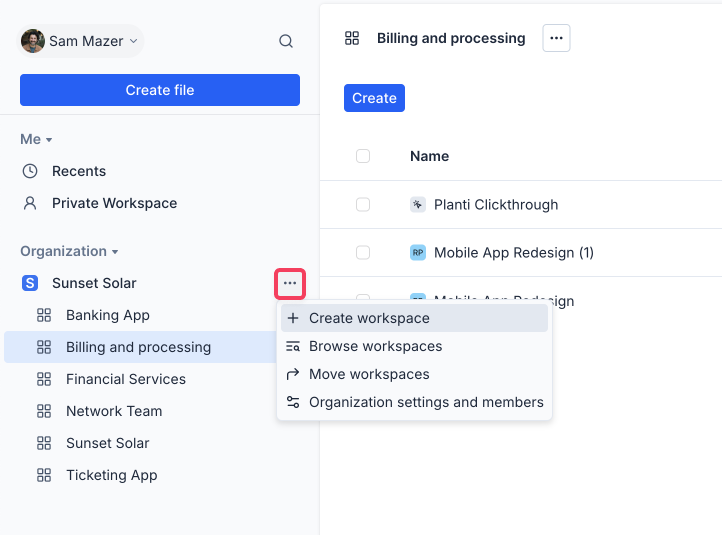
- Click the Options button
•••next to your organization’s name and select Create workspace.
-
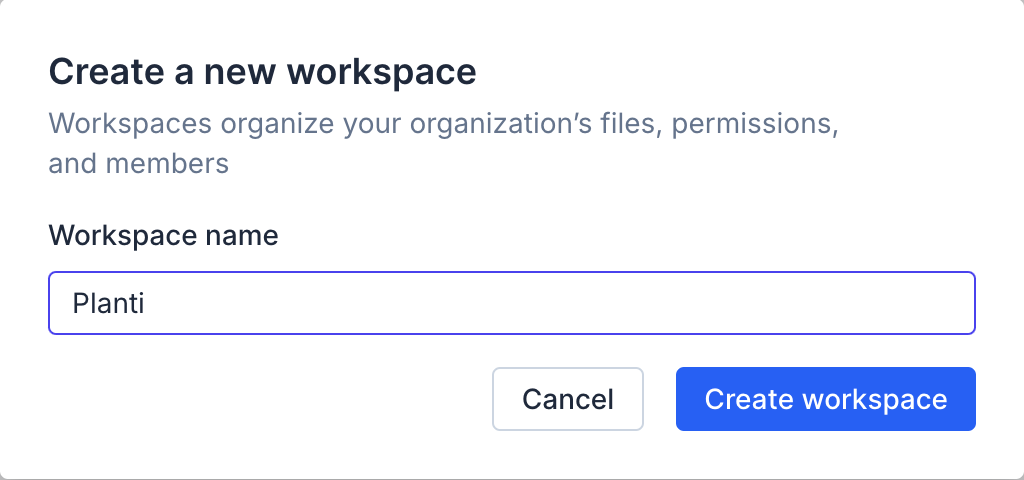
Give the workspace a name.
-
Click Create workspace.
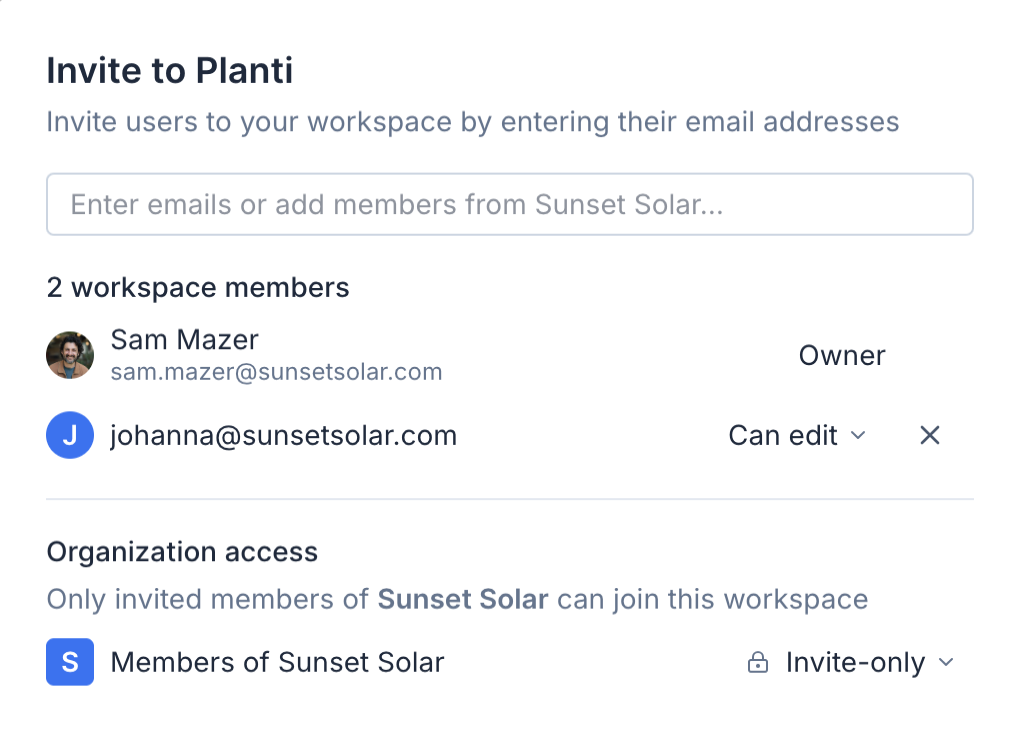
- In the next dialog, you can:
- Add email addresses to invite others to the workspace.
- Configure workspace permissions.
- Configure the workspace's organization access.
Adding folders to workspaces
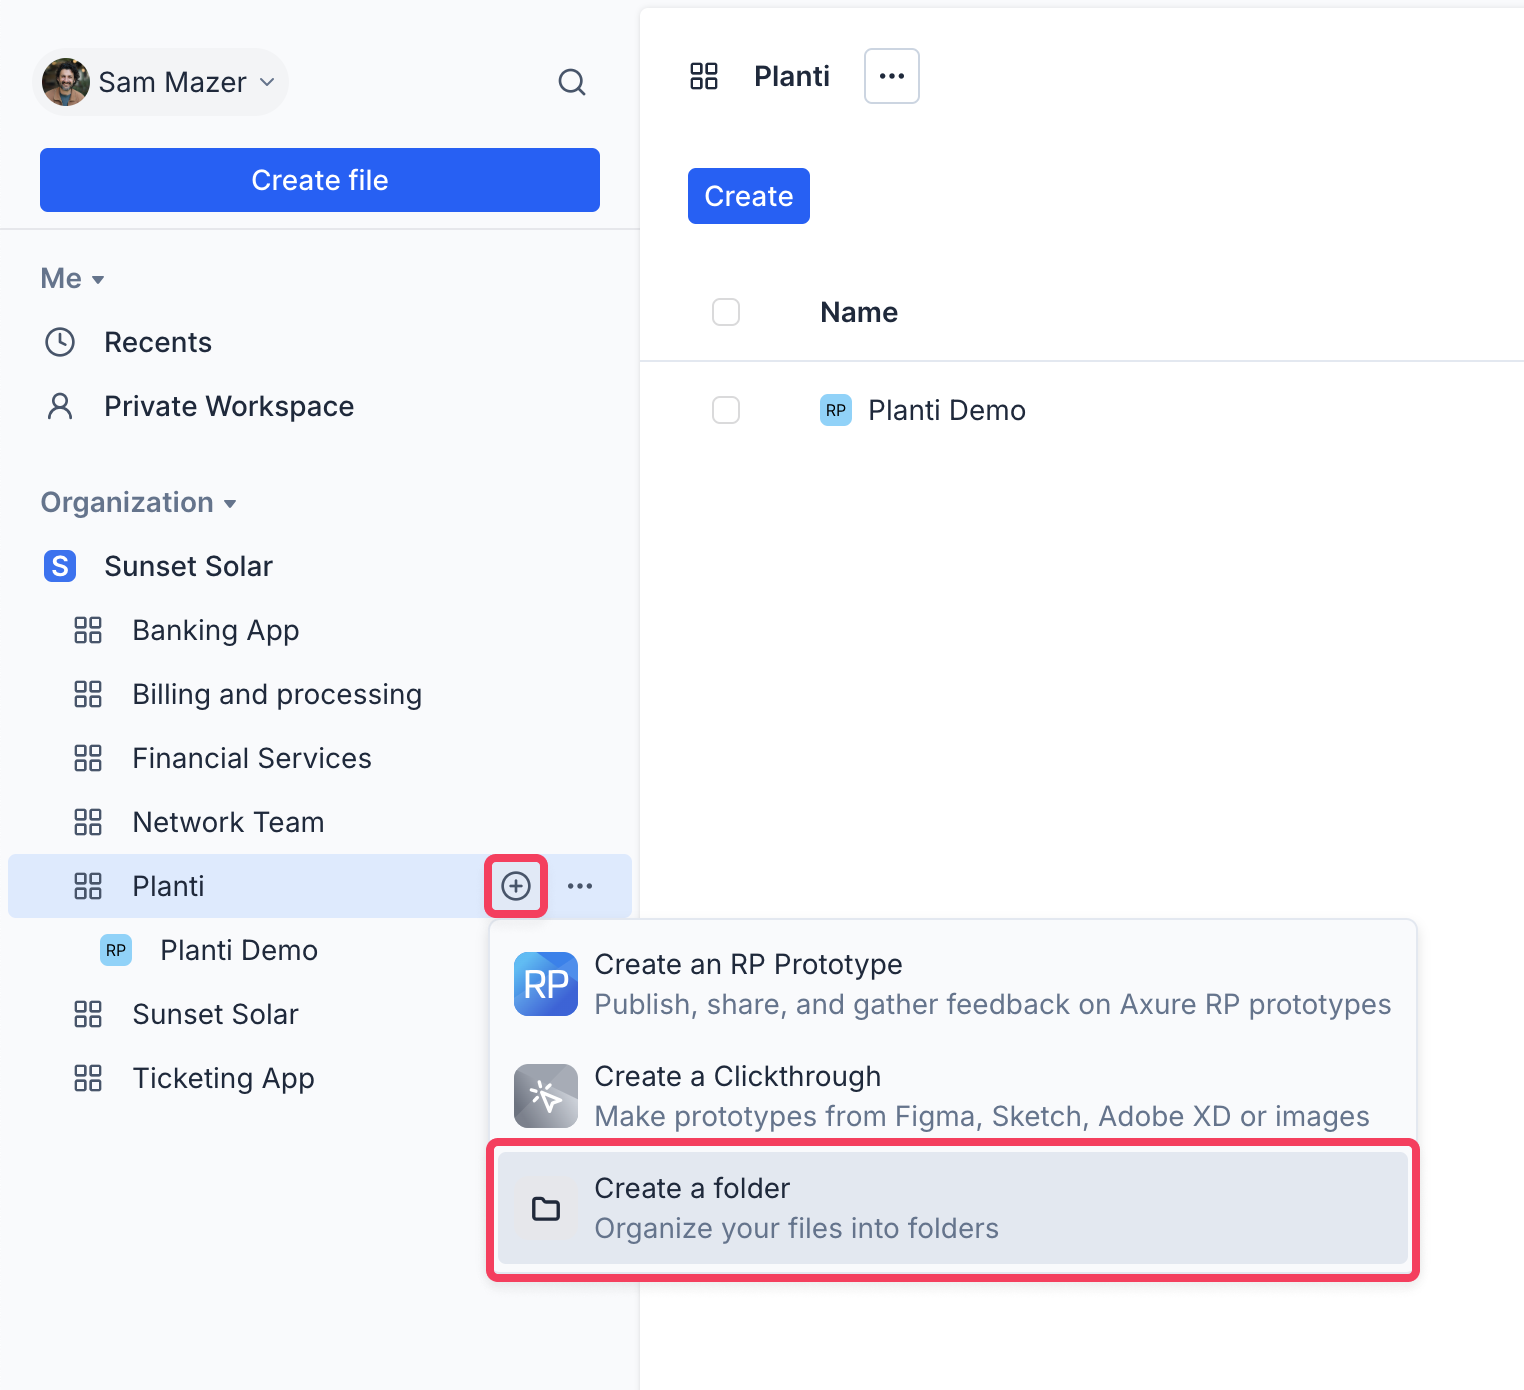
You can further organize your workspaces into folders and subfolders. To create a folder, click the Add button + next to the workspace name then select Create a folder.
Moving items between workspaces
-
Check the box to the left of the folder or item you want to move.
-
Click Move in the menu that appears at the bottom of the screen.
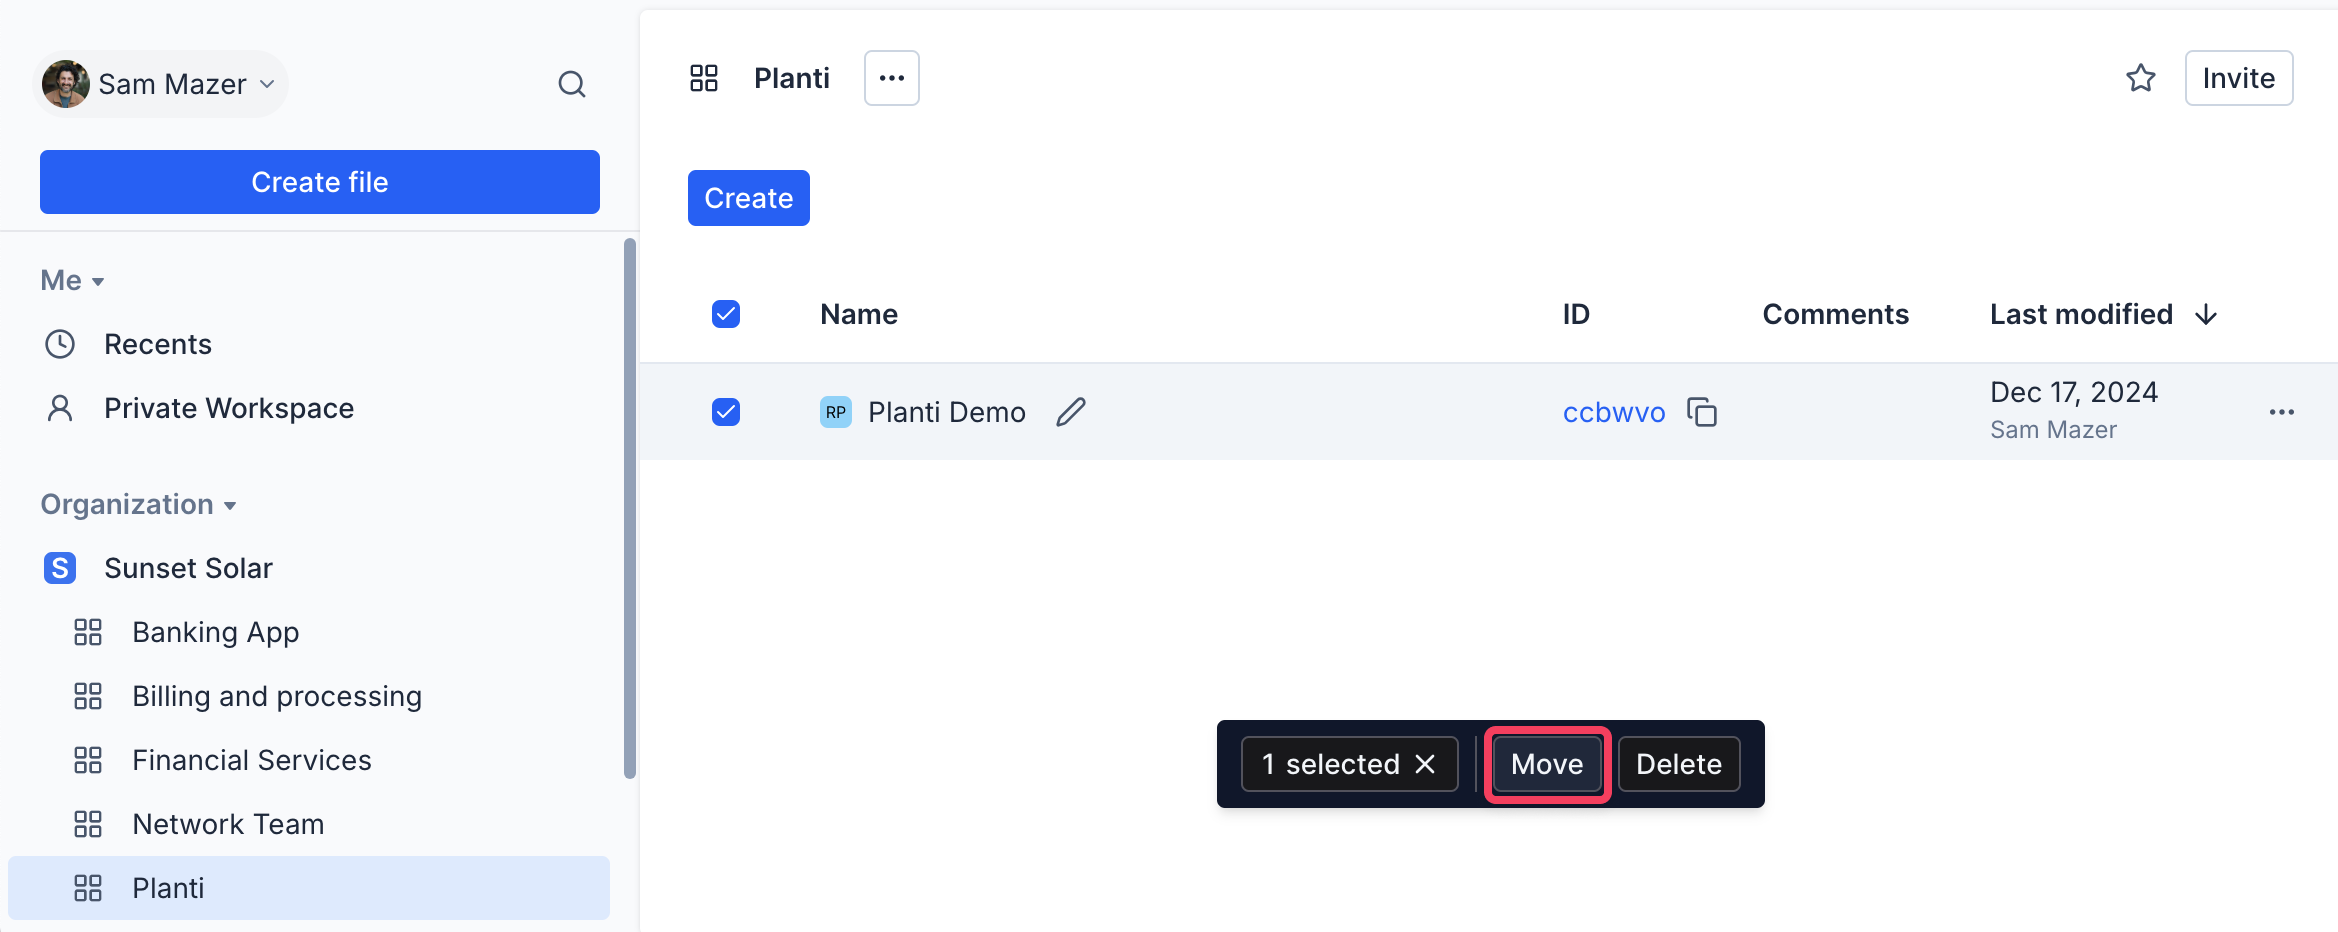
- Click the workspace or folder you want to move the item to in the list that appears.
Using drag and drop to reorder items
Within a workspace, you have the flexibility to reorder your items according to your preference by dragging and dropping. This allows you to arrange your RP prototypes, documents, whiteboards, and other supported items in a sequence that makes the most sense for your team's needs.
You can drag and drop items directly within and between the sidebar or main content area of a workspace to reorder them.
If you have sorted the items in the workspace (e.g., by name or date), manually reordering them will override any active table sorting.
Selecting multiple items
You can select multiple items for bulk actions by using the checkboxes located in the main content area. Simply check the boxes next to each item you wish to include in your selection.
Once you have selected multiple items you can treat them as a single unit for certain actions. For example, you can drag and drop the selected group of items to a different location within the current workspace, to another folder, or to a different workspace in the sidebar.
Nesting items
To further structure your workspaces, you can nest RP prototypes, documents, whiteboards, and other items beneath other items. This hierarchical structure helps in organizing projects by client, feature, sprint, or any other logical grouping.
Deleting folders and items
Deleting a folder will also delete all of its contained items and subfolders. To delete a folder:
-
Check the box to the left of the folder or item you want to delete.
-
Click Delete in the menu that appears at the bottom of the screen.
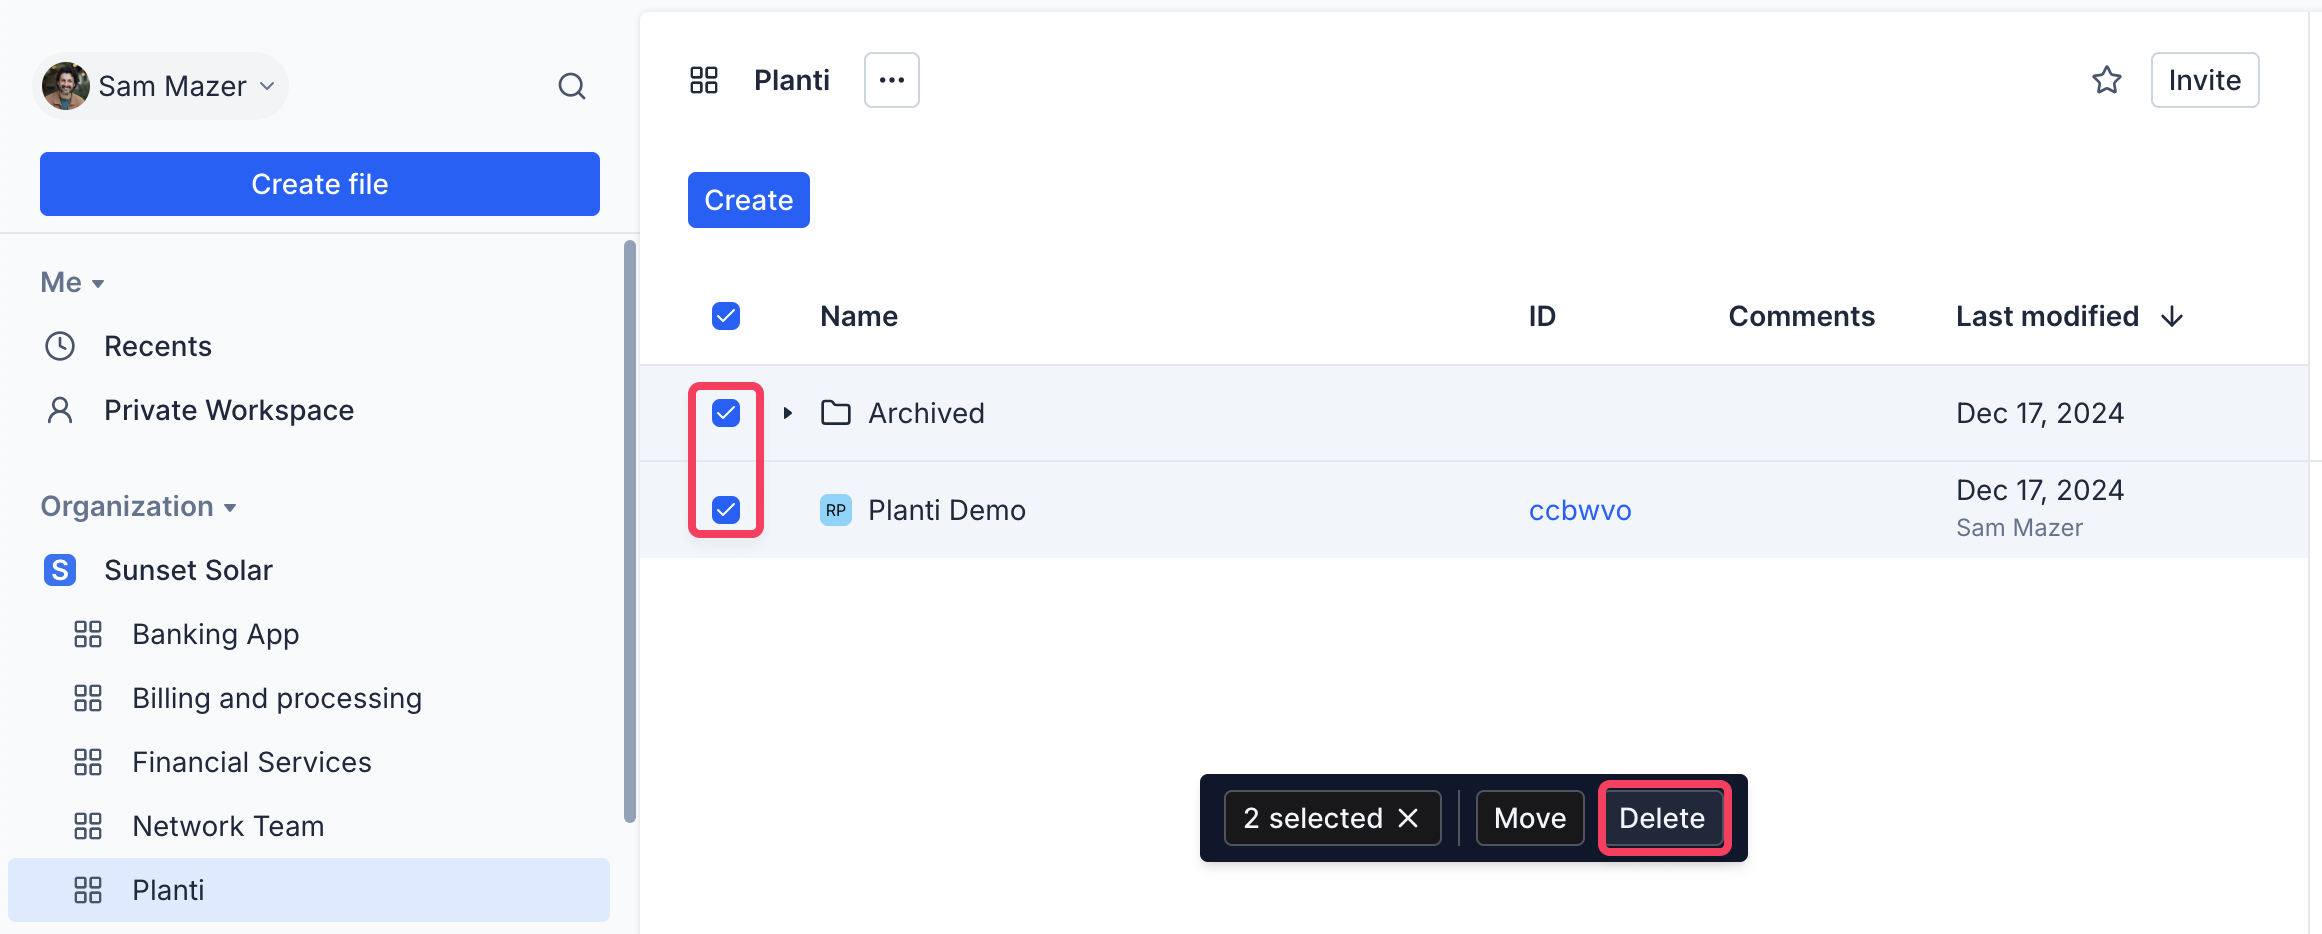
This cannot be undone. Before proceeding, move any items you want to keep out of the folder.
Favoriting workspaces
Favoriting a workspace will add the workspace to the Favorites section of your sidebar. To favorite or unfavorite a workspace:
-
Click
•••next to the workspace name. -
Select Favorite to add it to your favorites or Unfavorite to remove it.
The Favorite workspaces section will not be visible if you haven't favorited any workspaces.
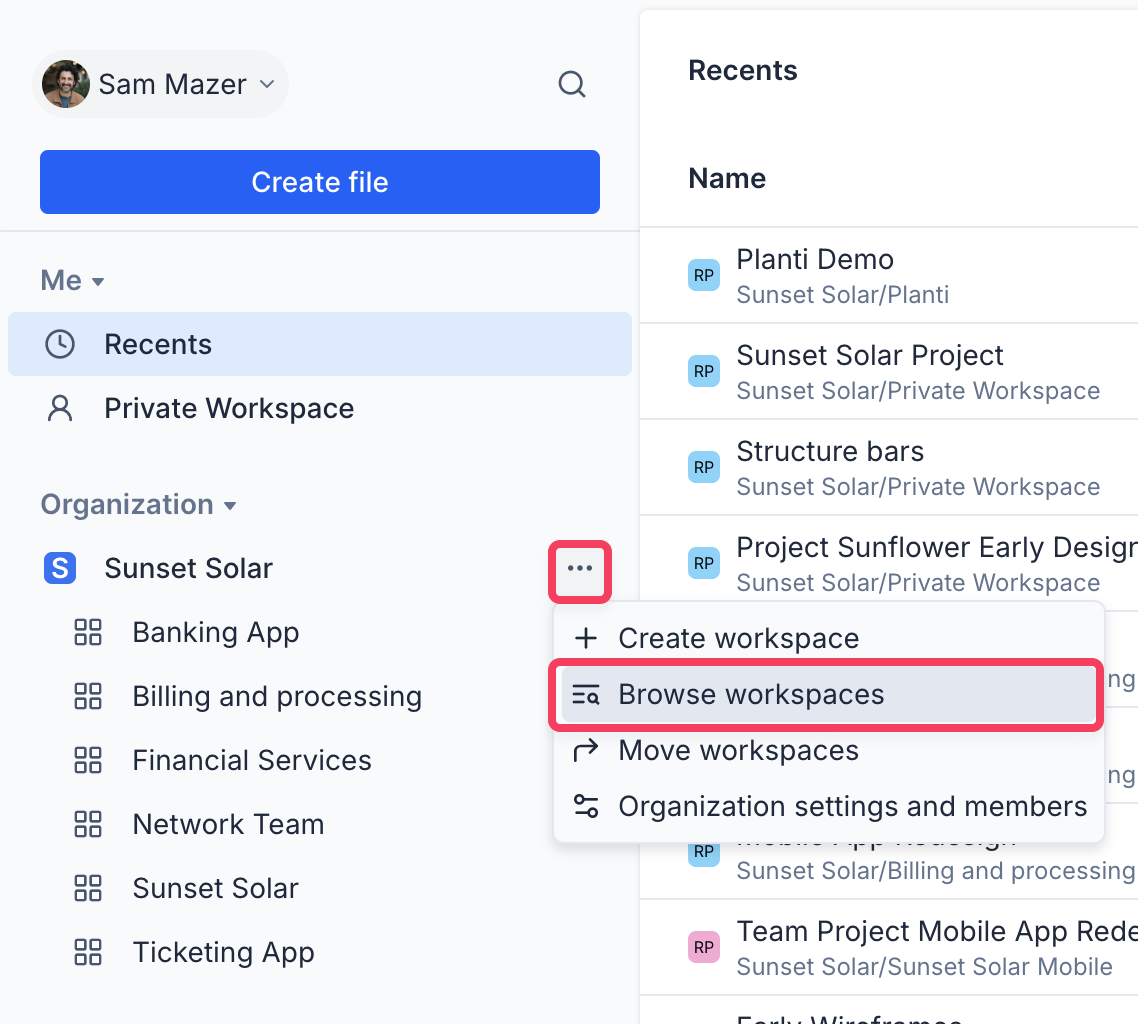
Browsing and joining workspaces
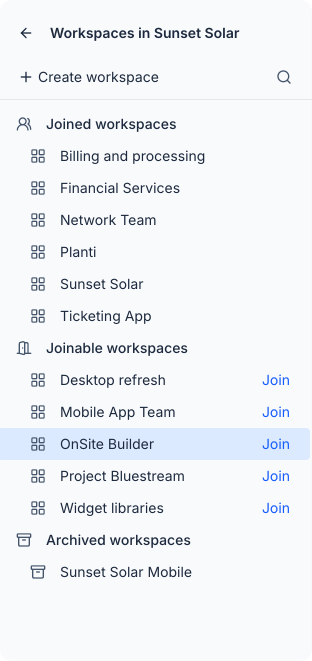
All members (but not guests) can browse and join workspaces in their organization that they haven't joined. To browse and join workspaces:
-
Click
•••next to the organization name. -
Select Browse workspaces.
-
Select a workspace from the list to view it.
-
Click Join to join the workspace.
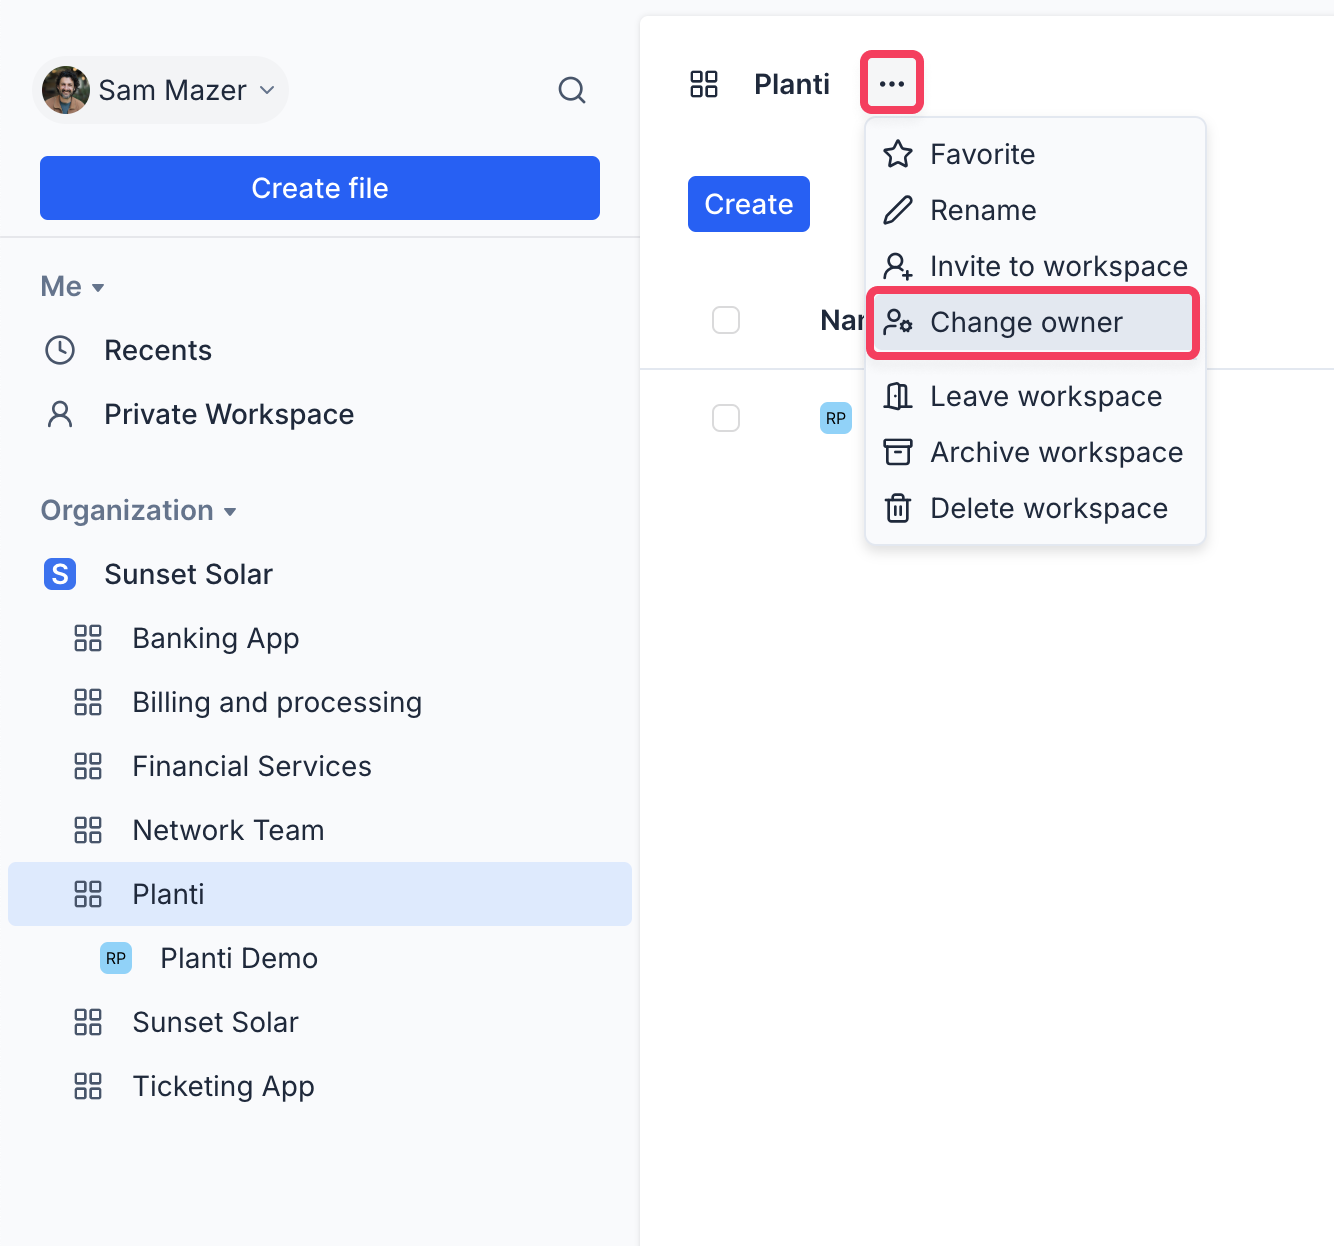
Changing workspace owners
The current owner of a workspace can transfer ownership of the workspace to another user. To change owners:
-
Click
•••next to the workspace name. -
Select Change owner.
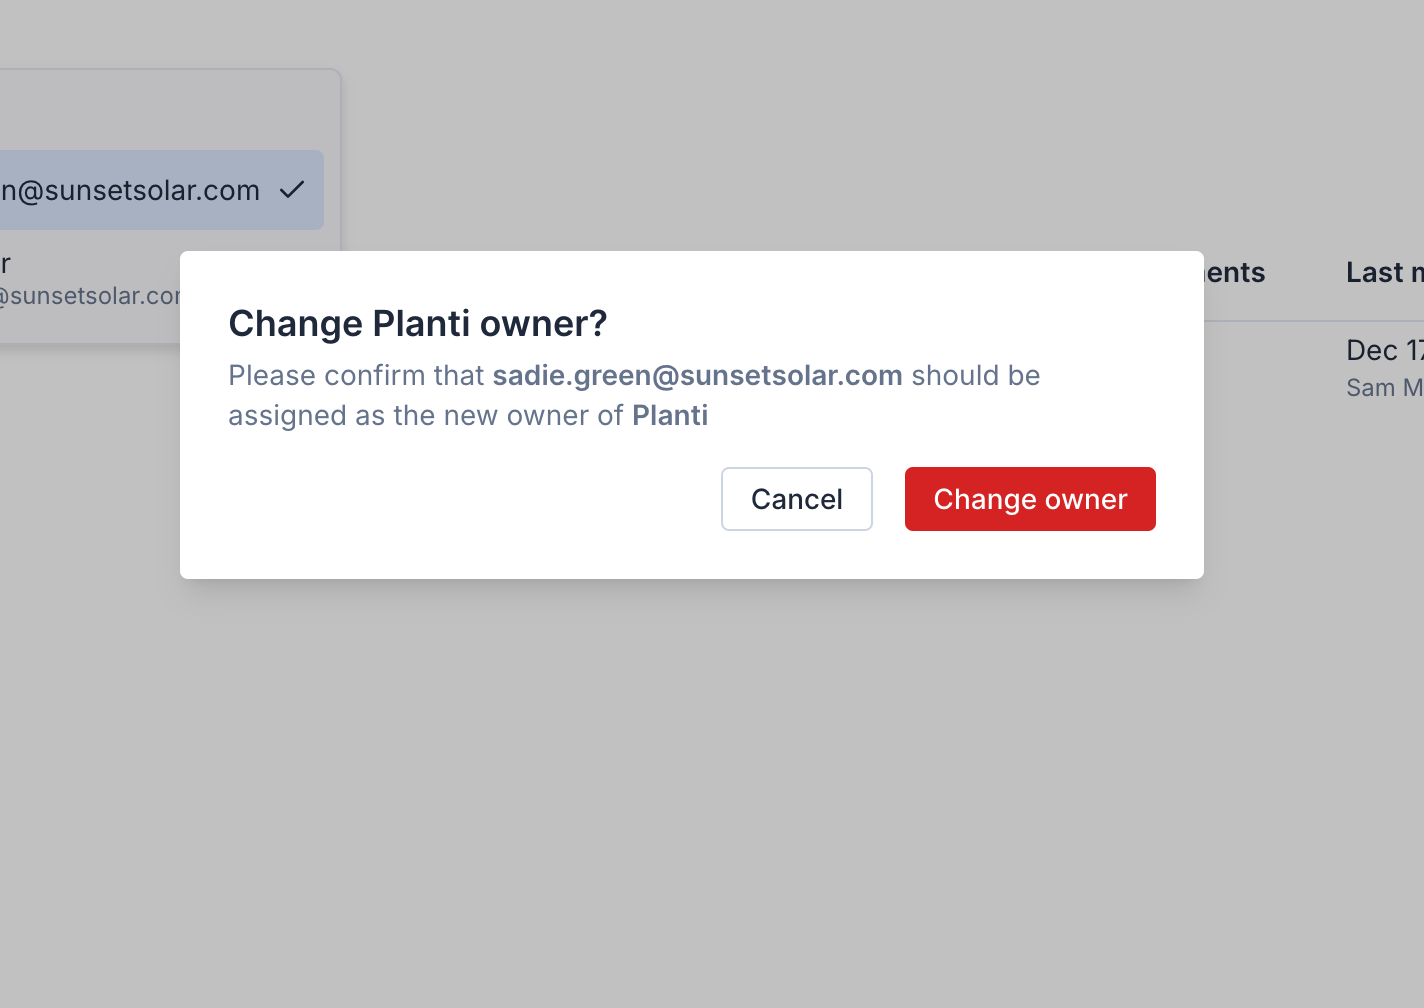
-
Select a new workspace owner.
-
In the dialog that appears, click Change owner.
All members (but not guests) of an organization can be a workspace owner.
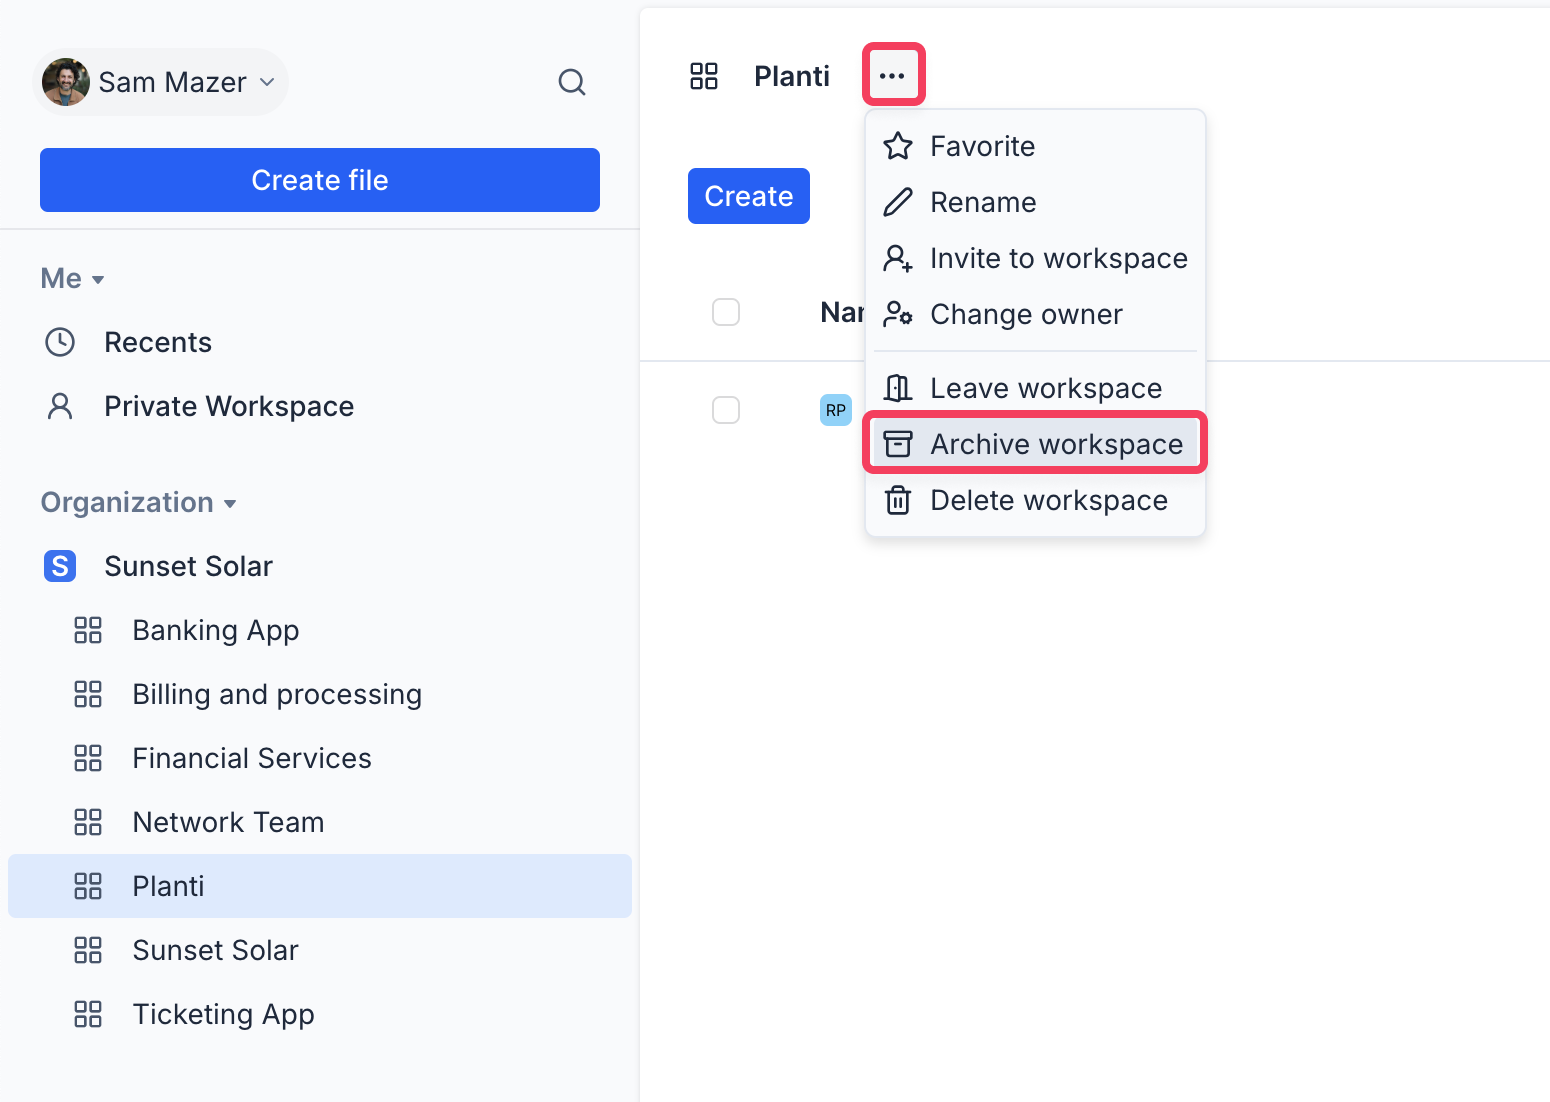
Archiving workspaces
If you want to hide a workspace from your sidebar, you can archive it. To archive a workspace:
-
Click
•••next to the workspace name. -
Select Archive workspace.
- In the dialog that appears, click Archive workspace to confirm.
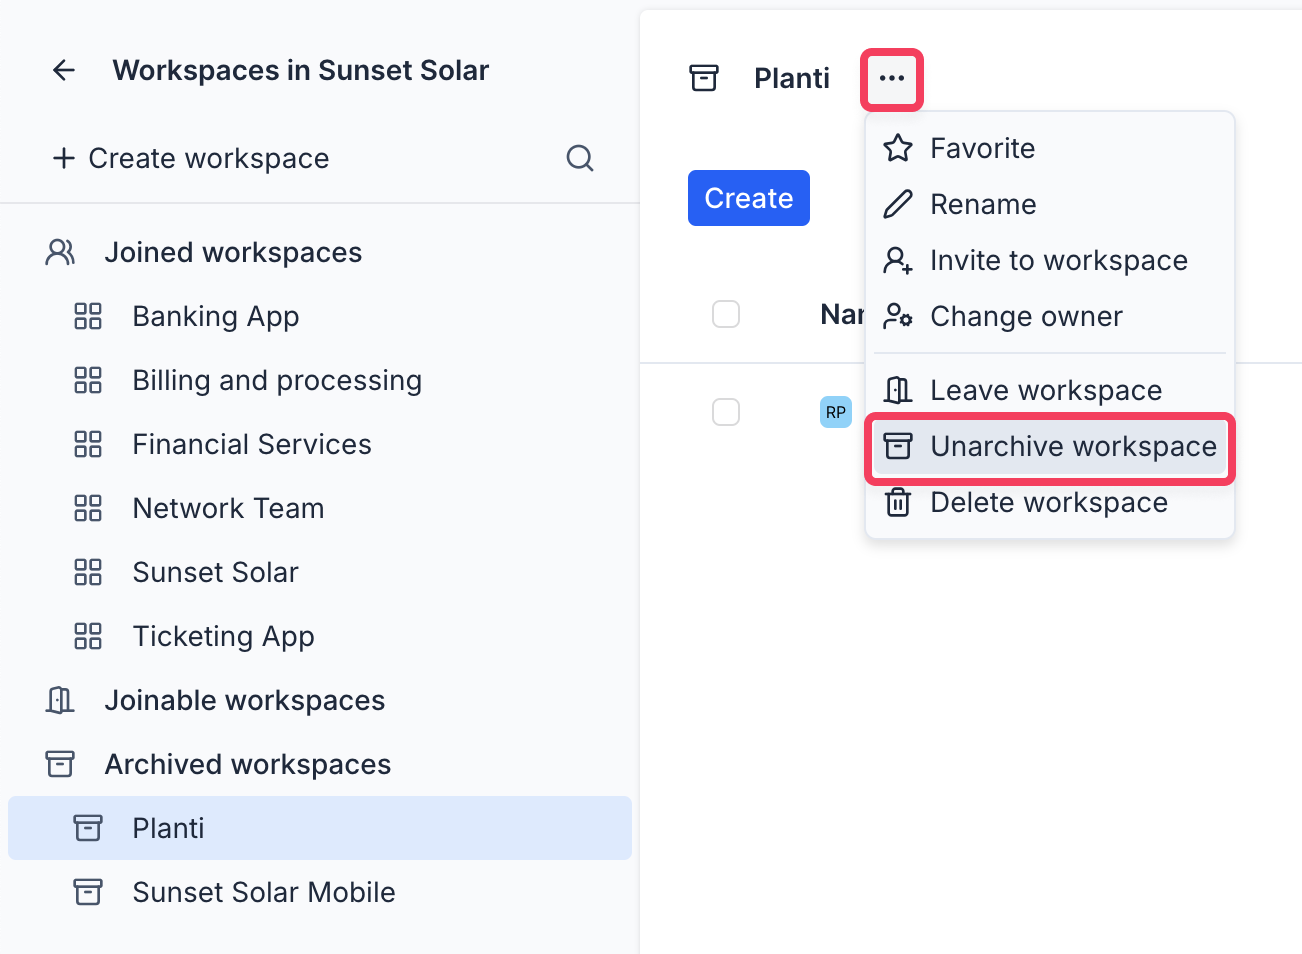
If you need to unarchive a workspace, you can do so by browsing workspaces within the organization:
-
Click
•••next to the organization name. -
Select Browse workspaces.
-
Under the Archived workspaces section, hover over a workspace.
-
Click
•••next to the workspace name. -
Select Unarchive workspace.
Archiving/unarchiving workspaces will do so for every member of the organization.
Leaving workspaces
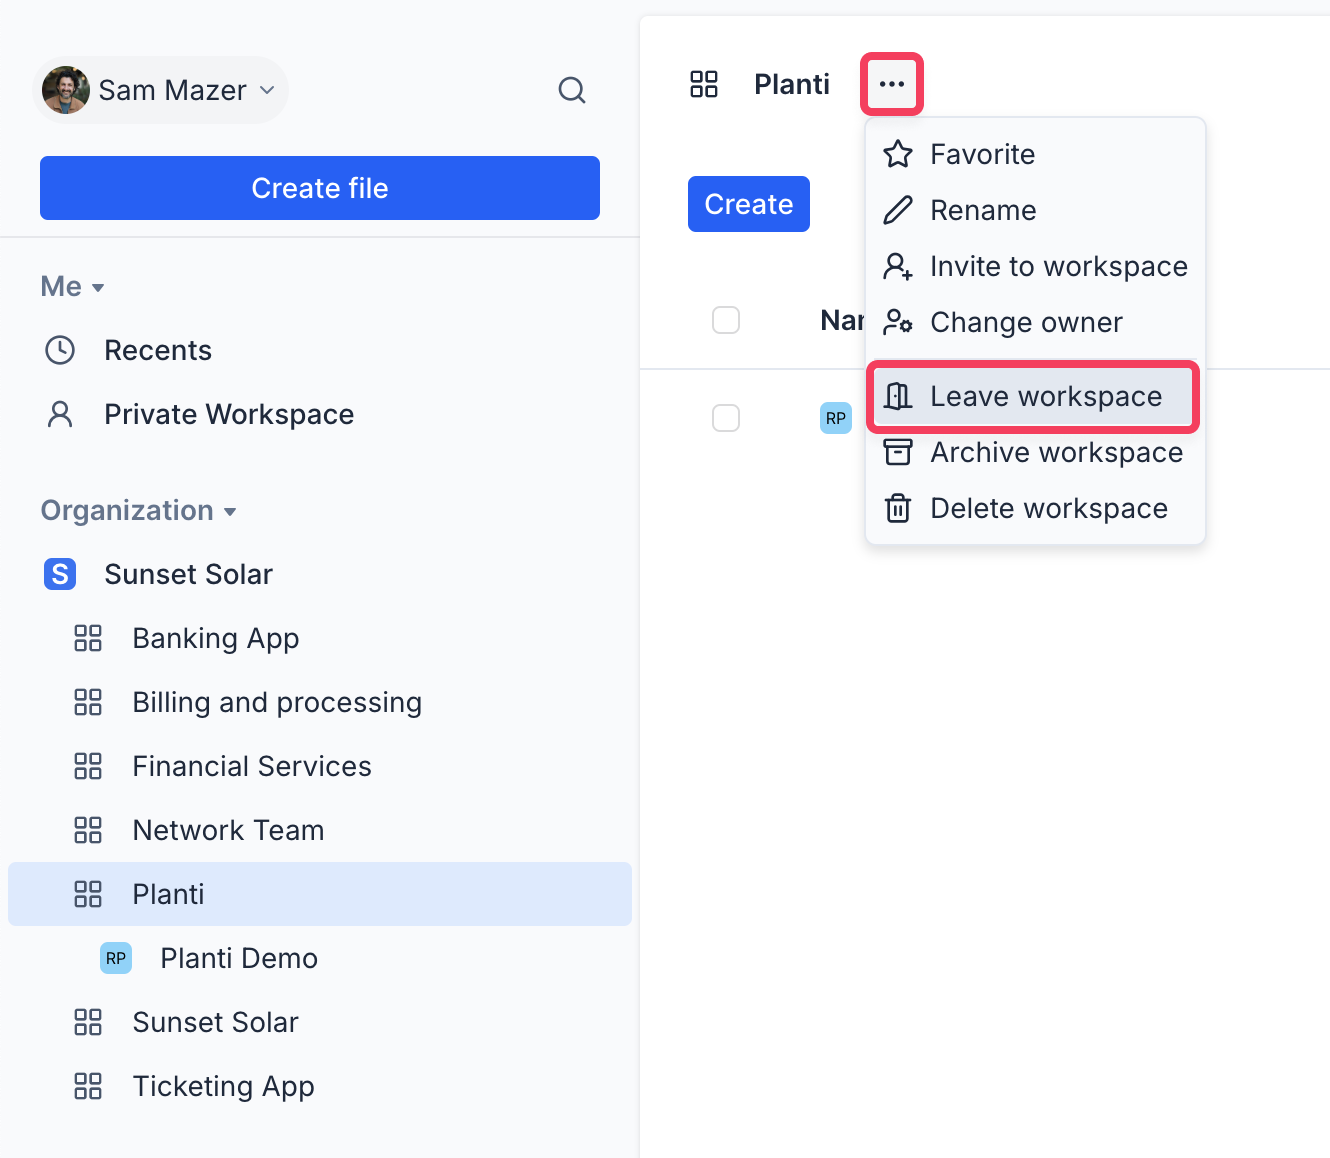
If a workspace is no longer relevant, you can leave it at any time. To leave a workspace:
-
Click
•••next to the workspace name. -
Select Leave workspace.
- If you are the owner of the workspace, you'll need to select a new owner from the list of existing members before you can leave.
If there are no other members in the workspace, you will need to add another user first before you can leave the workspace. Alternatively, you can change the owner, archive, or delete the workspace instead.
Deleting workspaces
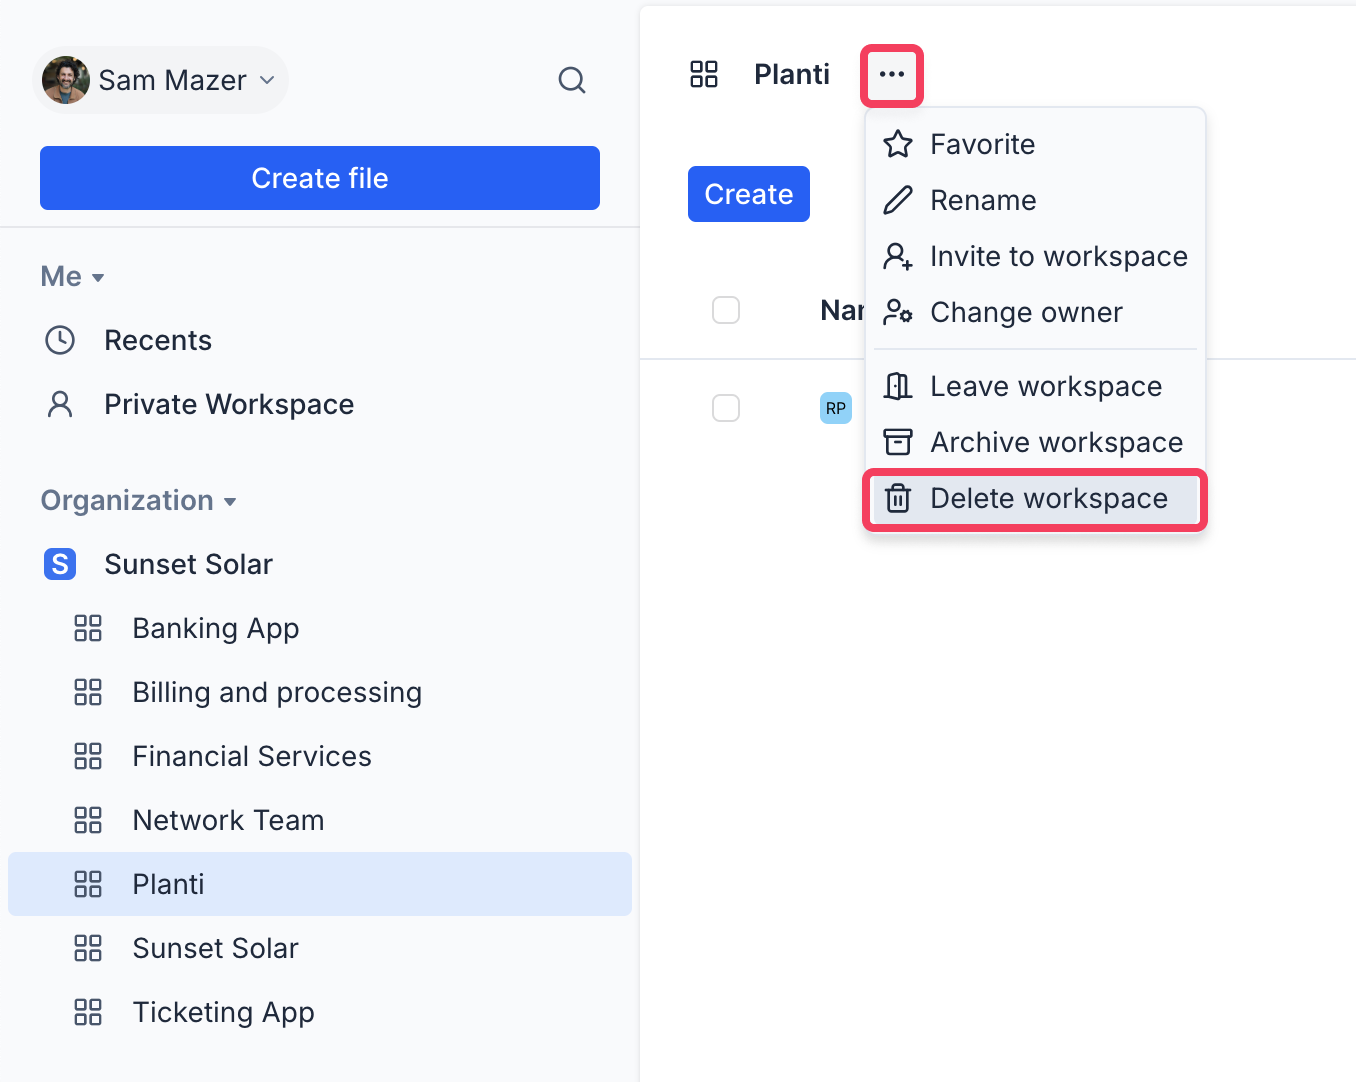
Deleting a workspace will also delete all of its contained items and folders. To delete a workspace:
-
Click
•••next to the workspace name. -
Select Delete workspace.
- In the dialog that appears, click Delete workspace to confirm.
This cannot be undone. Before proceeding, move any items you want to keep out of the workspace.
Sharing workspaces with others
You can share access to your workspaces with other Axure Cloud users. You can give them full access to the items in a workspace so they can collaboratively build, publish, and manage them with you, or you can restrict them to viewer-only access.
All members (but not guests) of an organization can browse and join any workspace within the organization. Guests in your organization can only access the workspaces that they have been invited to.
For teams with an Axure Cloud for Business instance, workspaces within your Cloud instance’s organization can be set to Invite only.
Workspace permissions
There are four permission levels for Axure Cloud workspaces:
-
Owner: The owner has full access to all items in the workspace, even items created by other users. The owner can also add new users to the workspace, remove existing users, and change users' permissions. The owner is usually the person who created the workspace, but a new owner can be appointed if the original creator changes workspace owners or leaves the workspace.
-
Admin: Users that are Admins within an organization will be an admin in every workspace they are joined to. They have the same level of permissions as the owner.
-
Can edit: Users added with permission to edit will have full access to all items in the workspace, even items created by other users. Invite someone to a workspace as an editor if you want them to be able to edit items in the workspace, create new items, and delete items.
Users who can edit can also invite other users to the workspace, but they cannot remove users or change users' permissions
-
View only: Users with View only access can preview, comment on, and inspect RP prototypes in the workspace. They can also view whiteboards and documents, but cannot edit or comment on them. View only users cannot make changes to items or user settings.
Users must have Can edit access if you want them to contribute to team projects in the workspace.
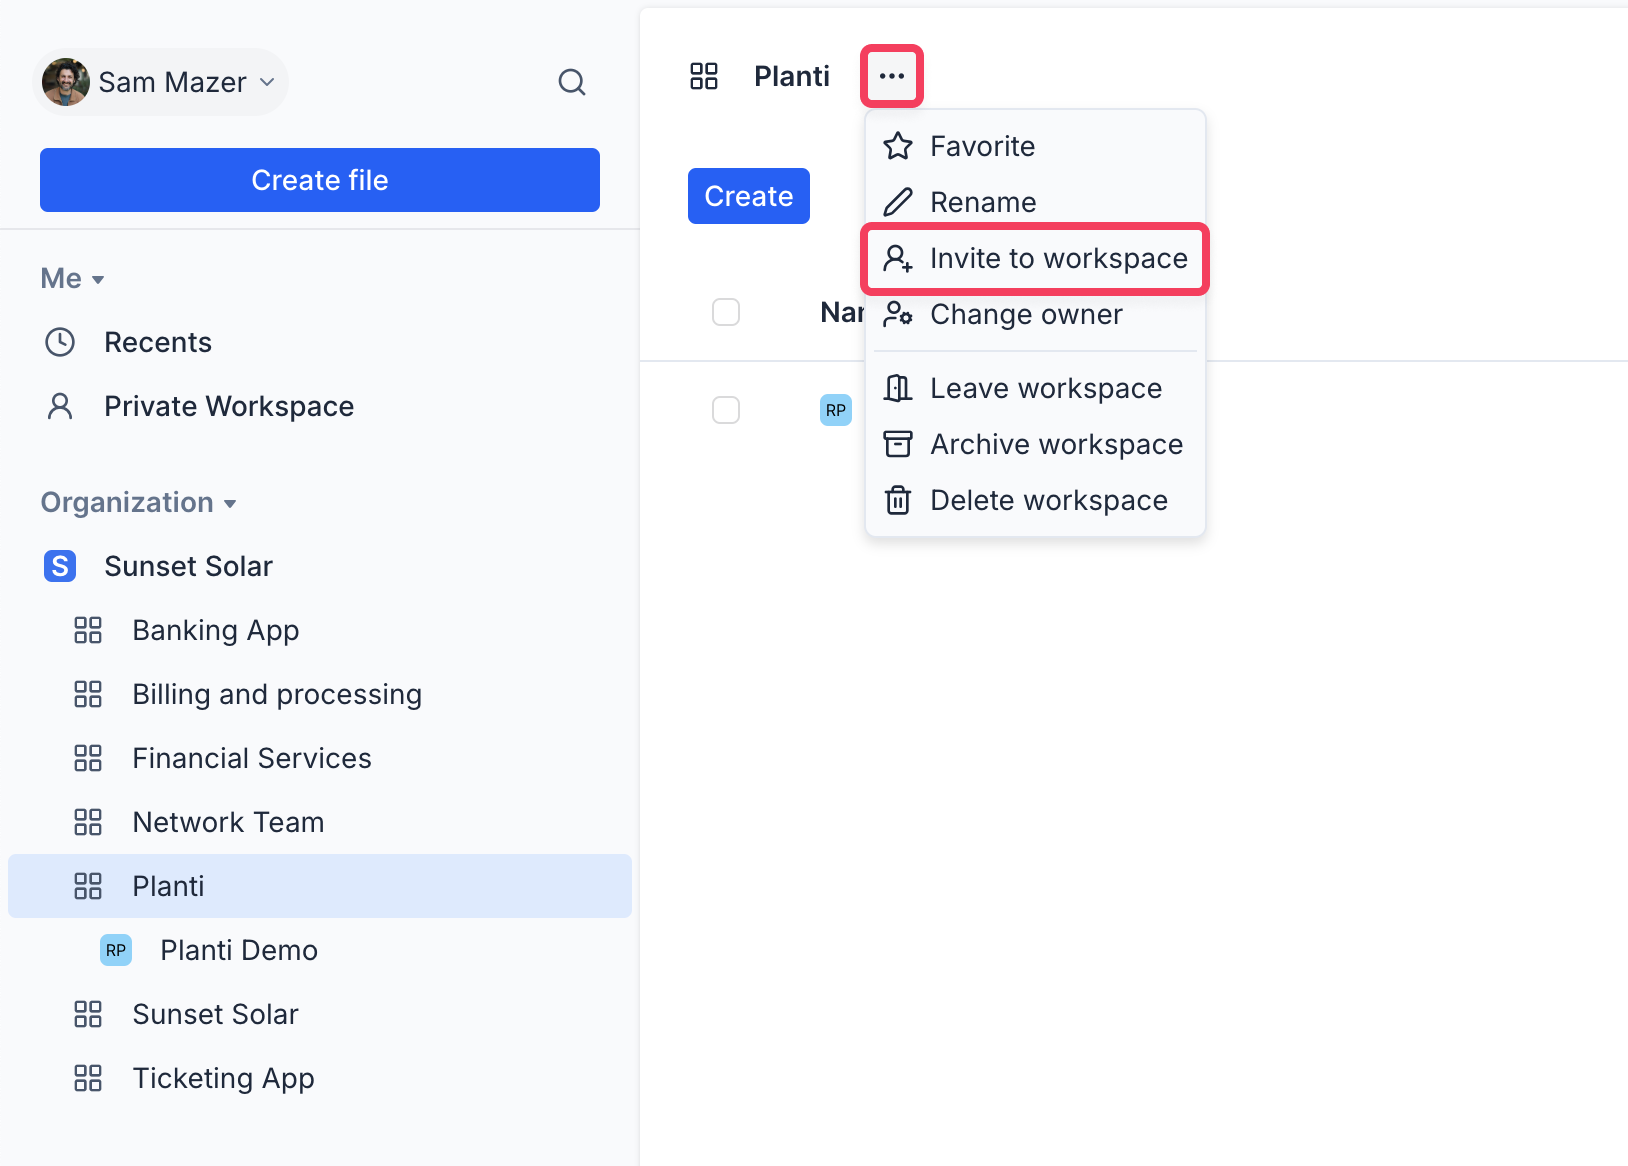
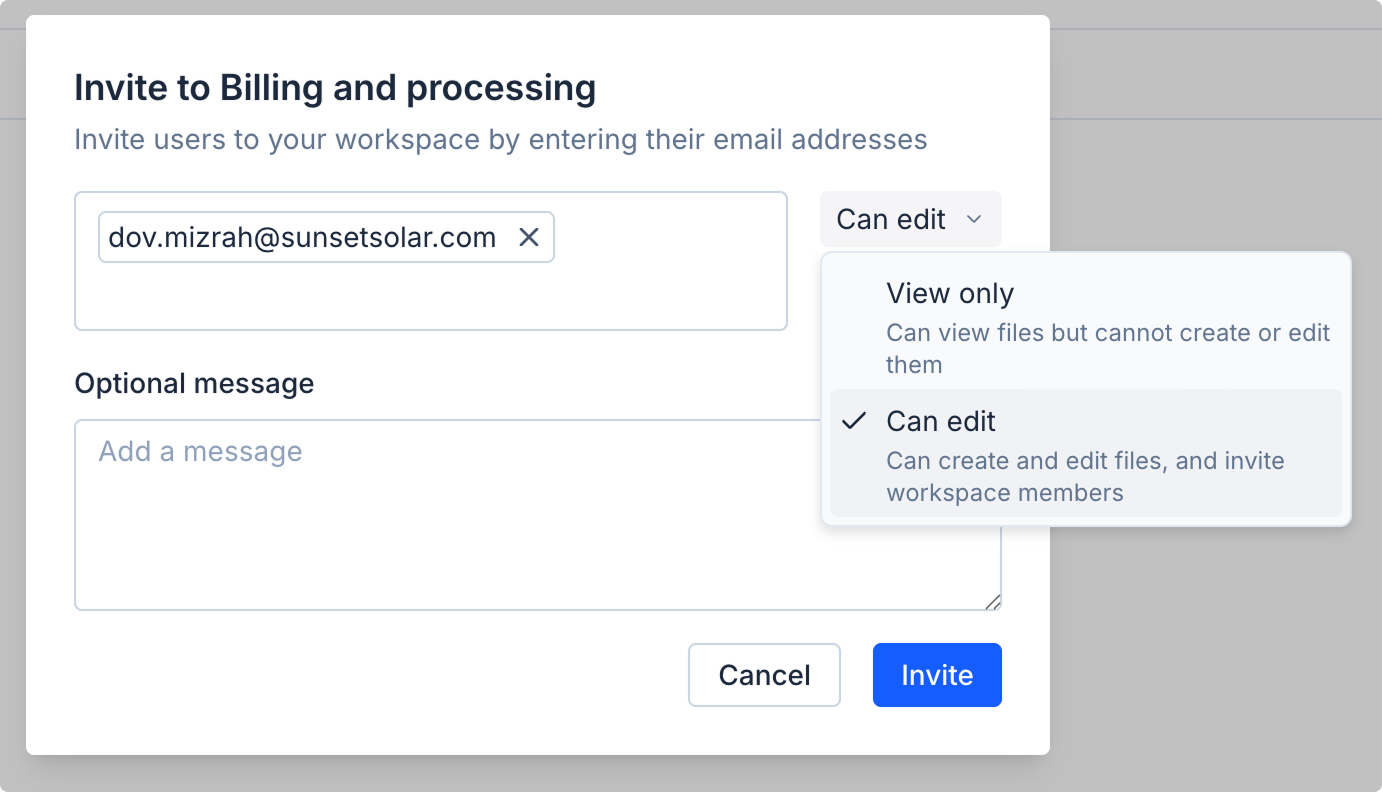
Inviting new users
-
Click
•••next to the workspace name. -
Select Invite to workspace.
-
Enter the email addresses of the users you would like to invite.
-
Click Invite to confirm. Your teammates will be able to access the workspace the next time they sign in to Axure Cloud.
If you invite teammates who do not yet have Axure Cloud accounts, they will receive an email inviting them to sign up for free.
Changing workspace permissions
The owner (or an admin) of a workspace can change other users' permissions at any time. To change permissions:
-
Click
•••next to the workspace name. -
Select Invite to workspace.
-
In the dialog that appears, you can do the following:
-
Select View only or Can edit in the dropdown next to a user's email address to change their permissions.
-
Click the X on the right side of a user's access level to remove them from the workspace.
-
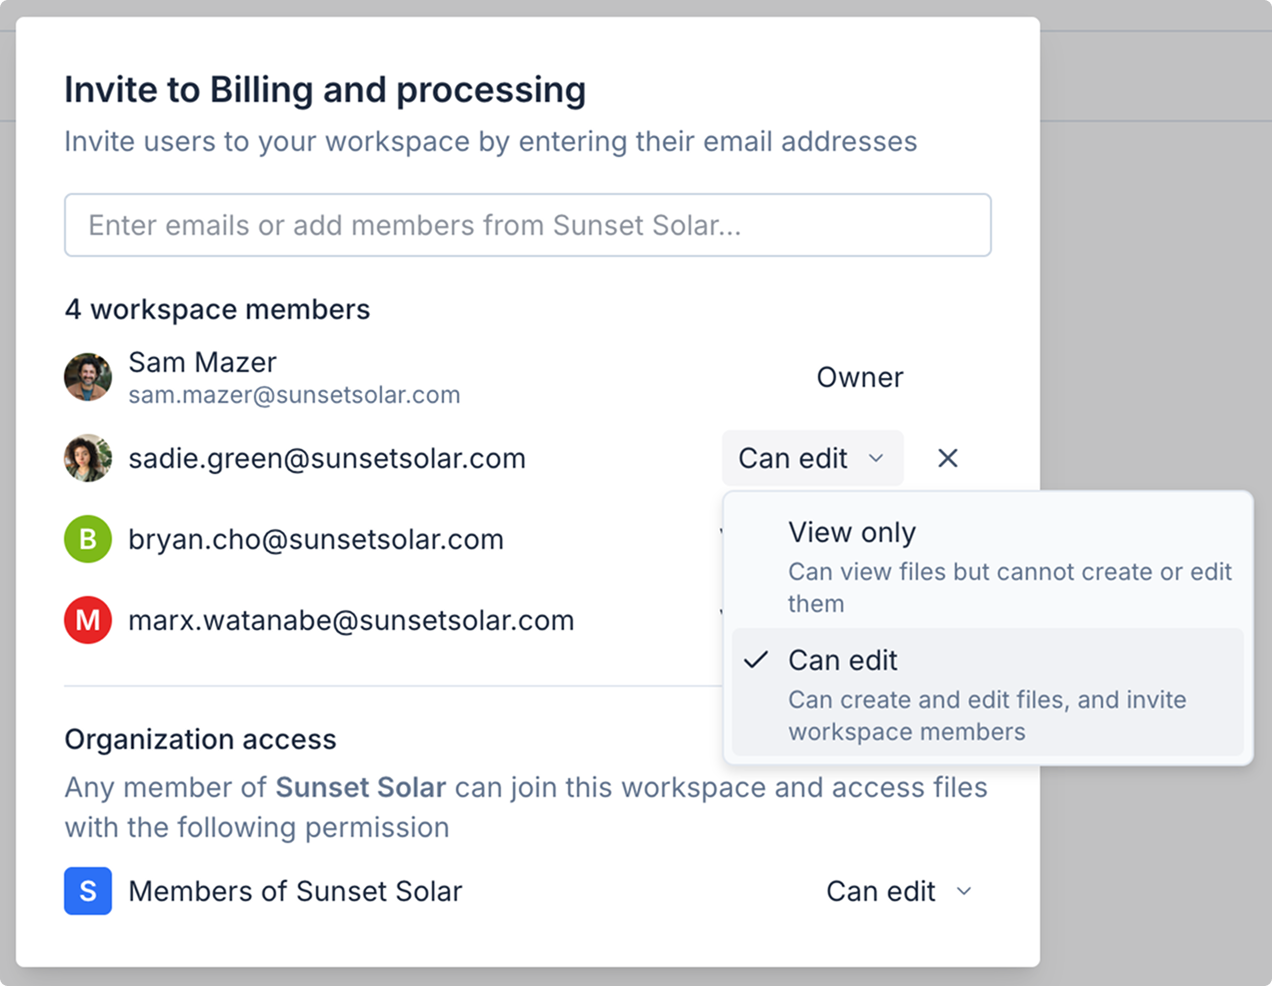
Organization access
Organization access allows you to set the permission level for members when they join the workspace. For Axure Cloud for Business, you can also set a workspace to Invite-only. To manage access:
-
Click
•••next to the workspace name. -
Select Invite to workspace.
-
Under Organization access in the dialog that appears, choose between:
- Can edit: Organization members can join with Can edit permissions.
- View only: Organization members can join with View only permissions.
- Invite only: Organization members must be invited to the workspace to join (Axure Cloud for Business only).
Changing the organization access permissions for a workspace will not affect the permissions of users who are already in the workspace, and will only affect users who join in the future. The owner of a workspace can also change the permissions of any user at any time.
Publishing to a workspace
When publishing to Axure Cloud from Axure RP, click the ellipsis icon at the bottom-right of the project's name to choose which workspace and folder you want to publish the project to.
When publishing from app.axure.cloud or the Axure Cloud desktop app, click the Add button next to the workspace or folder you want to publish to and select Create an RP Prototype in the context menu.
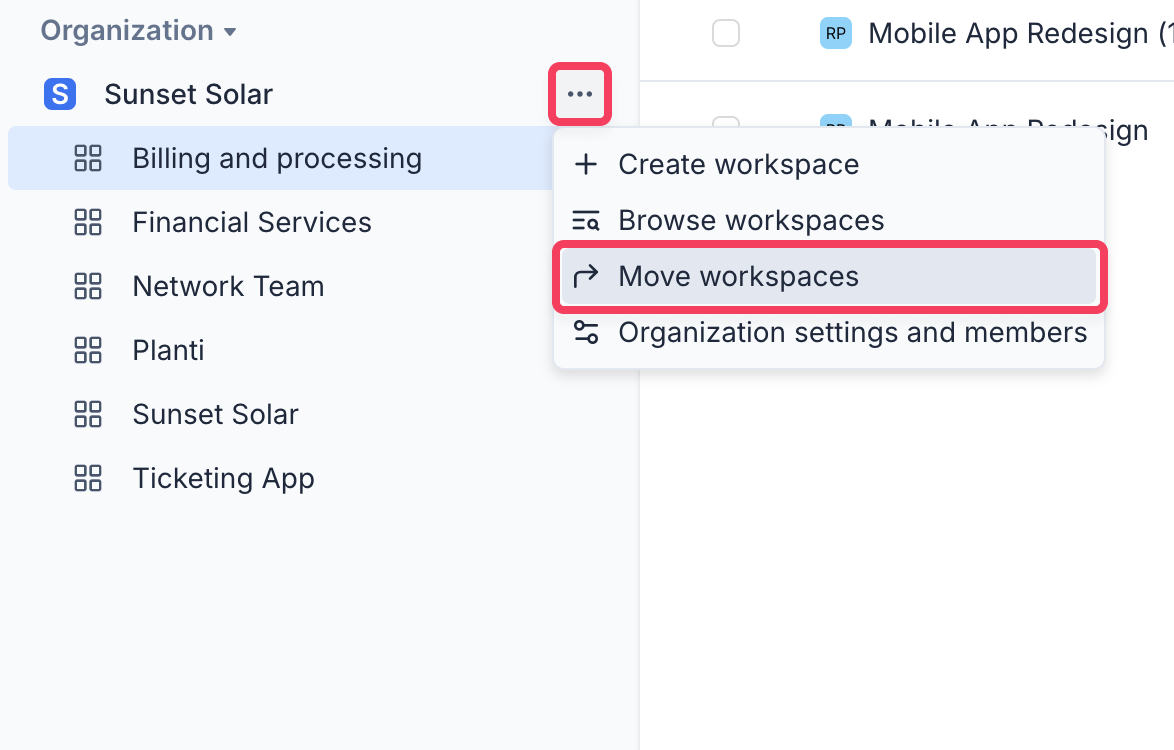
Moving workspaces between organizations
You can move workspaces either between organizations that you are added to or between Axure Cloud and Axure Cloud for Business private instances. Follow the steps below to get started.
-
Open your web browser and sign in to app.axure.cloud or your private instance, depending on where you want to move your workspaces.
-
Click
•••next to your organization. -
Select Move workspaces.
-
Select the workspaces you wish to move.
-
Select the organization or Cloud instance you wish to move them to.
-
Click Move.
- If needed, you can move your workspaces back to the original Axure Cloud or private instance at any time.
- You must be an owner/admin of a workspace to move it.
- Only members who belong to both the workspace and selected organization will continue to have access after it is moved.
- Axure Cloud for Business On-Premises does not support moving workspaces.